No-Bake Peanut Butter Cheesecake Balls are a delightful treat that combine the creamy, tangy flavors of cheesecake with the rich, nutty taste of peanut butter, all in a bite-sized form! They’re easy to make and require no baking, making them perfect for a quick, indulgent dessert or party snack.
Here’s a simple recipe for these irresistible peanut butter cheesecake balls:
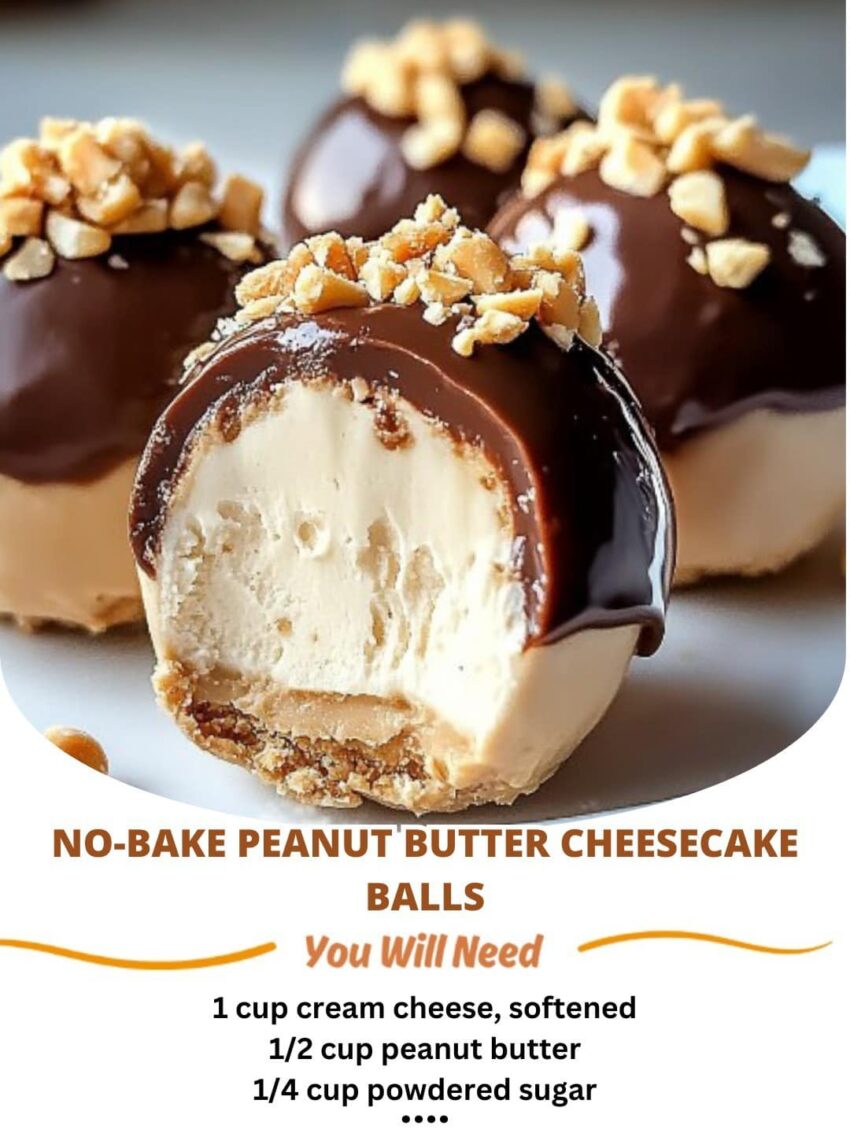
No-Bake Peanut Butter Cheesecake Balls
Ingredients:
- 8 oz cream cheese, softened
- 1/2 cup peanut butter (creamy or chunky, your choice)
- 1/4 cup powdered sugar
- 1 tsp vanilla extract
- 1/2 cup graham cracker crumbs (for a cheesecake base flavor)
- 1/4 cup mini chocolate chips (optional, for a fun twist)
- 1/4 cup melted chocolate (for dipping, optional)
- Pinch of salt (optional, to balance the sweetness)
Instructions:
1. Prepare the Cheesecake Mixture:
- In a large mixing bowl, combine the softened cream cheese and peanut butter. Use an electric mixer or a hand whisk to beat them together until smooth and creamy.
- Add in the powdered sugar, vanilla extract, and a pinch of salt (if using). Mix well until everything is fully incorporated and smooth.
- Gently fold in the graham cracker crumbs and mini chocolate chips (if using). The mixture should be thick enough to shape into balls, but soft and creamy.
2. Form the Balls:
- Scoop out small portions of the mixture (about 1 tablespoon per ball) and roll them into smooth balls with your hands.
- Place the balls on a parchment-lined baking sheet or tray, spacing them out so they don’t touch each other.
3. Chill:
- Once all the balls are formed, place the tray in the refrigerator and chill for at least 30 minutes to an hour, allowing the balls to firm up.
4. (Optional) Dip in Chocolate:
- If you want to add a chocolate coating, melt the chocolate in a microwave-safe bowl in 20-second intervals, stirring in between, until fully melted and smooth.
- Dip each chilled peanut butter cheesecake ball halfway into the melted chocolate, then return them to the parchment-lined tray.
- Let the chocolate set by refrigerating the balls for an additional 15-20 minutes, or until the chocolate is firm.
5. Serve:
- Once the balls are chilled and the chocolate has set (if using), they are ready to serve!
- Store leftover peanut butter cheesecake balls in an airtight container in the refrigerator for up to 5 days.
Tips for Success:
- Peanut Butter: If you’re a peanut butter lover, you can increase the amount of peanut butter slightly for a stronger flavor. You could also use chunky peanut butter for added texture!
- Chocolate: For a fun variation, try rolling the balls in crushed nuts, sprinkles, or mini candy pieces instead of or in addition to the chocolate.
- Chill Time: Don’t skip the chill time, as it helps the balls firm up and makes them easier to handle when dipping in chocolate or serving.
- Cream Cheese: Make sure your cream cheese is softened to room temperature so it combines well with the peanut butter and sugar. Cold cream cheese will make the mixture lumpy.
Why You’ll Love These Peanut Butter Cheesecake Balls:
These no-bake peanut butter cheesecake balls are perfectly sweet, rich, and creamy with a lovely peanut butter flavor. They’re super easy to make and don’t require any baking, so they’re perfect for when you’re short on time or just want a no-fuss treat. The added chocolate coating makes them extra indulgent, but they’re equally delicious without it!
These would make a great addition to any holiday party, potluck, or just as a sweet snack for the family. Let me know if you give them a try!