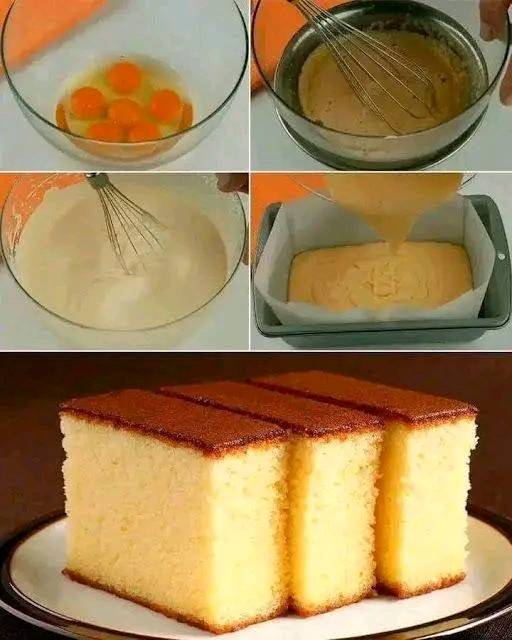
Castella Cake is a popular Japanese sponge cake known for its soft, moist texture and sweet, honey-like flavor. It’s a bit denser than some traditional sponge cakes but still light and airy. Perfect for afternoon tea or as a sweet treat for any occasion!
Here’s how to make it at home:
Ingredients:
- 4 large eggs (room temperature)
- 200g (1 cup) granulated sugar
- 120g (1/2 cup) honey (use a mild honey for the best flavor)
- 60ml (1/4 cup) milk
- 1/2 tsp vanilla extract (optional)
- 120g (1 cup) all-purpose flour
- 1/4 tsp baking soda (optional, but helps with texture)
- 1/4 tsp salt
- 60g (1/4 cup) unsalted butter, melted
- Powdered sugar for dusting (optional)
Instructions:
-
Prepare your baking pan: Preheat your oven to 320°F (160°C). Line a 9×5 inch loaf pan with parchment paper, making sure it covers the bottom and sides completely. This will help the cake come out easily after baking.
-
Mix the wet ingredients: In a heatproof bowl, whisk the eggs and sugar together until the mixture is light and fluffy. You can do this by hand, but using a hand mixer or stand mixer is recommended for the best results. You want the mixture to become pale and increase in volume. This can take about 5-7 minutes.
-
Add honey and milk: In a small saucepan, heat the honey and milk over low heat just until warm (don’t let it boil). Stir to combine, then pour the honey-milk mixture into the egg-sugar mixture and mix gently until smooth.
-
Sift the dry ingredients: In another bowl, sift the flour, salt, and baking soda together. Sifting ensures there are no lumps in your flour, and it helps the cake stay light.
-
Combine the wet and dry ingredients: Gradually add the sifted flour mixture into the wet mixture. Use a rubber spatula or whisk to gently fold in the flour. Be careful not to deflate the air you’ve incorporated into the eggs.
-
Add the butter: Melt the butter and let it cool slightly, then gently fold it into the batter. The butter gives the cake a lovely richness and adds to its moistness.
-
Bake the cake: Pour the batter into your prepared loaf pan and smooth the top with a spatula. Tap the pan on the counter a few times to remove any air bubbles that may have formed.
Bake in the preheated oven for about 40-45 minutes. You’ll know the cake is done when it’s golden brown on top, and a toothpick inserted into the center comes out clean. If the top starts to brown too quickly, cover it loosely with aluminum foil.
-
Cool the cake: Let the cake cool in the pan for about 10 minutes, then transfer it to a wire rack to cool completely. Castella cake is best enjoyed once it has cooled down, and it often tastes even better the next day.
-
Serve: Once the cake is fully cooled, you can dust it with powdered sugar for an elegant finish, though it’s delicious without it too. Slice it into thin pieces to serve.
Tips:
- Texture: Castella cakes are known for their dense yet soft texture. If you want an even more delicate texture, you can use cake flour instead of all-purpose flour.
- Flavor variations: You can add a teaspoon of matcha powder, cocoa powder, or a few drops of lemon zest for different flavors.
- Storage: Castella cake keeps well at room temperature for a couple of days, and even better the next day as it continues to develop flavor. Just wrap it in plastic wrap or store it in an airtight container to keep it moist.
Enjoy this delightful, honey-sweetened treat! It’s incredibly light yet satisfying, perfect for tea time or as a light dessert.
Would you like any suggestions on beverages or accompaniments to serve with it?